If you’re using GiveEasy for your donation campaigns and wondering how to setup eCommerce tracking in GA4 then you’re in the right place.
eCommerce tracking gives you those all-important details on value, type (one-off vs monthly) and appeal donated to. Without this information, it’s pretty hard (impossible?) to evaluate the performance of your digital fundraising activity.
The good news is the process is quite straightforward. Firstly, make sure you have Google Tag Manager (GTM) installed across your main website and your GiveEasy campaign pages. You’ll need GTM because we’re going to write some custom code to ensure that we can collect information from the thank you page.
If you run a test donation through your GiveEasy page, you’ll notice that the thank you page URL looks something like the below:
https://service.giveeasy.org/Features/Thanks/CHARITY-NAME/CAMPAIGN-NAME?charity_name=CHARITY%20NAME&giving_id=123456&amount=50.00&donor_email=somebody%40digitalninjas.com&donor_name=Somebody&donor_receipt_name=Somebody%20Dawson&giving_date=15%2f05%2f2023&appeal_name=CAMPAIGN%20NAME%20&giving_frequency_name=Once%20OffDepending on your specific setup, you may have some additional URL parameters visible. The ones we’ll be using today are:
giving_id
amount
appeal_name
giving_frequency_name
We also need to ensure that the personal data visible in the thank you URL isn’t ingested into GA4 as this would put you in breach of Google’s “Personally Identifiable Information (PII)” policy. We’ll tackle this in a separate post about removing PII from URLs.
There are 5 steps we need to follow to get the job done (each with a number of mico steps). These are detailed below.
In case you just can’t be bothered, then we’ve done the job for you with our free downloadable GiveEasy tracking template, just fill out the form below to get it. You can import this into your existing GTM container (just go to admin-> import) – just make sure you choose the option to “merge” the imported tags with your existing tags.
Download your GiveEasy GTM template here
Download this GTM template then import it into your existing GTM account (via admin->import) and then select “merge” with your existing GTM container. You can then test and deploy the code.
Step 1: Create Custom Variables in GTM
For each of the URL parameters we need to record in GA4 we need to tell GTM to extract it from the thank you page URL and save it as a variable for us to use later. We’re going to do this for giving_id, amount, appeal_name and giving_frequency_name.
- To do this head to the “variables” menu in GTM, now create a new user-defined variable.
- Select URL as the Variable type and call it GiveEasy – Amount then enter the details as shown in the screenshot below:
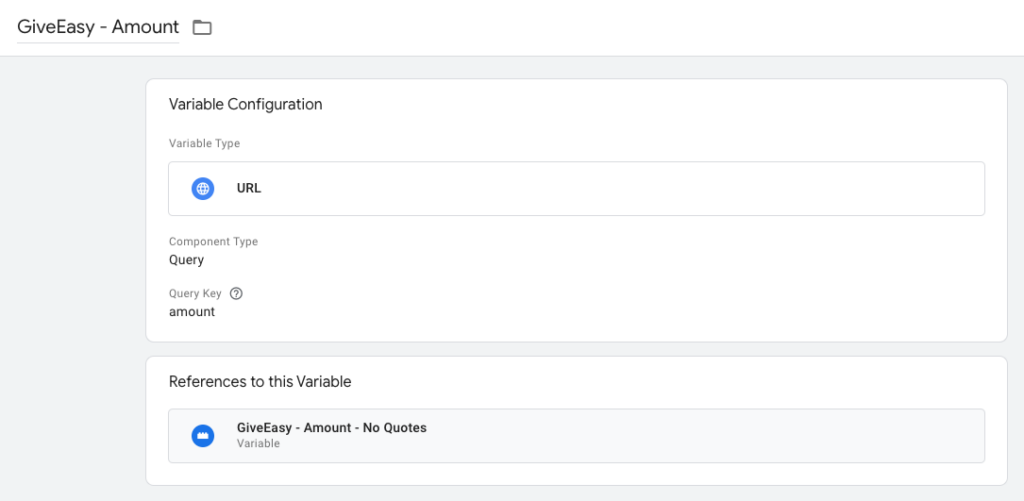
- Now repeat this process for each of the other URL parameters (giving_id, amount, appeal_name and giving_frequency_name), to ensure the custom dataLayer code works in step 3 of these instructions please use the following naming conventions:
| Query | GTM Custom Variable Name |
|---|---|
| amount | GiveEasy – amount |
| giving_id | GiveEasy – transaction ID |
| appeal_name | GiveEasy – item_name |
| giving_frequency_name | GiveEasy – item_category |
For those dataLayer enthusiasts amongst us you’ll notice some familiar conventions in the above names e.g. item_name – is the new dataLayer reference for product_name and item_category is the new name for product_category. Anyway, that’s enough dataLayer talk for now…
Step 2: Create another Variable for the Amount
The URL variable is stored in GTM as a string, GA4 is quite particular about how we pass donation amount and requires it as a number (otherwise known as an integer).
To transform the Amount variable into an integer we’re going to create a custom javascript variable, don’t worry it’s not as scary as it sounds:
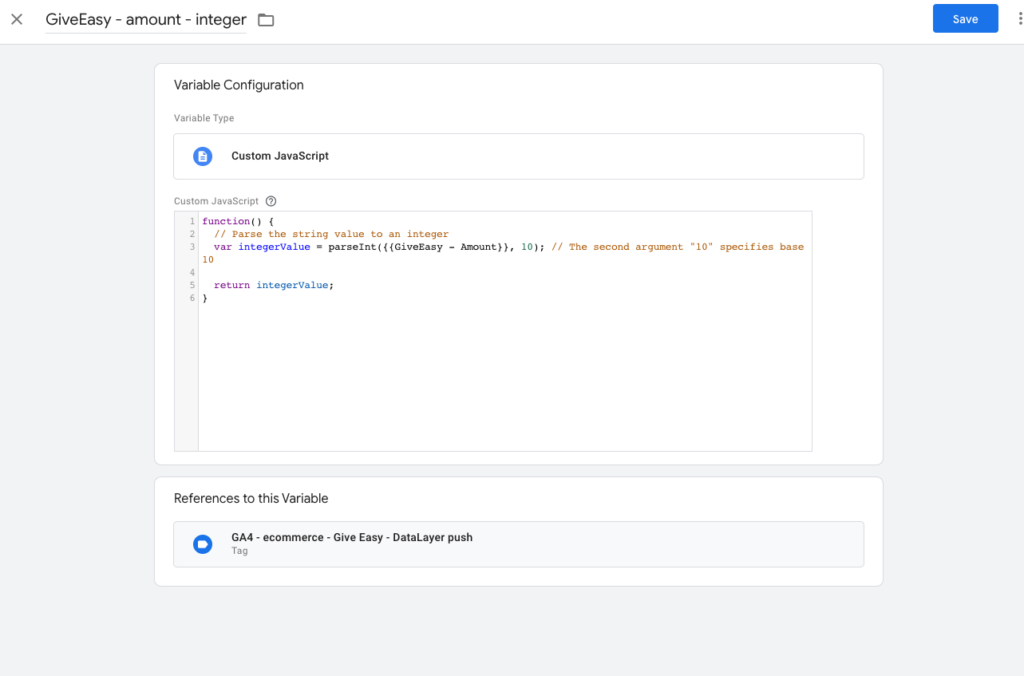
Here’s the custom javascript you need to enter in the above variable:
function() {
  // Parse the string value to an integer
  var integerValue = parseInt({{GiveEasy - Amount}}, 10); // The second argument "10" specifies base 10

  return integerValue;
}
Step 3: Create a Custom DataLayer push
Now we need to create 2 tags, one to get the dataLayer contents ready to push into GA4 and another to actually trigger the GA4 purchase event.
To do this
- Click Tags on the left nav and then create new
- Select custom HTML as the tag type
- Call the tag GA4 – ecommerce – Give Easy – DataLayer push
- Enter the details below (see code snippet for the custom HTML component):
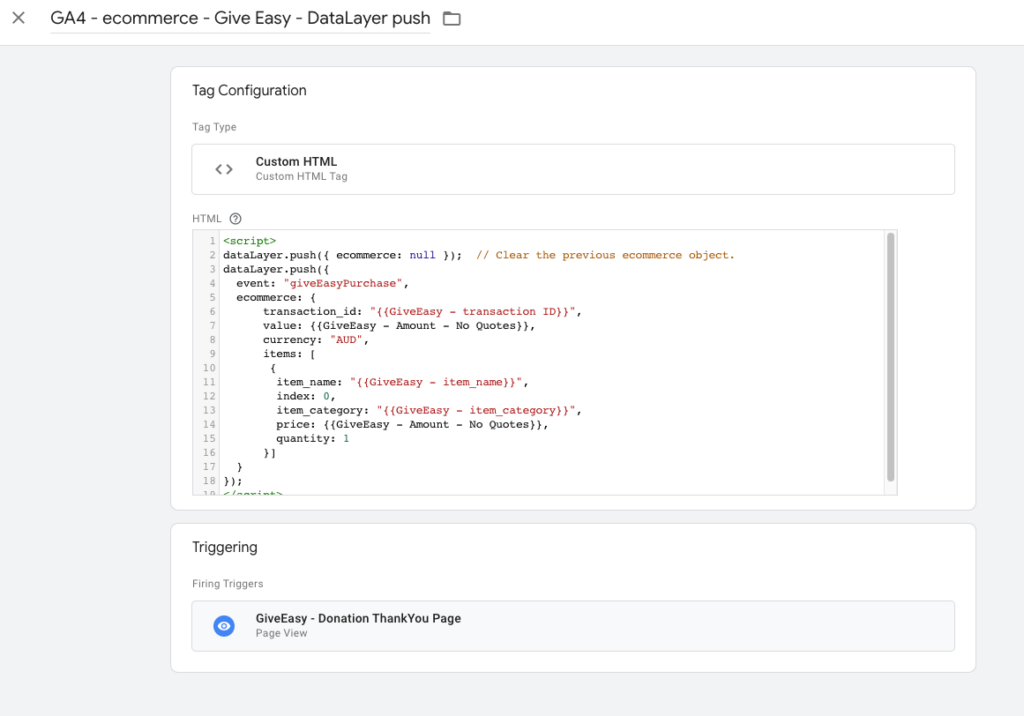
Custom HTML code to insert is:
<script>
dataLayer.push({ ecommerce: null });  // Clear the previous ecommerce object.
dataLayer.push({
  event: "giveEasyPurchase",
  ecommerce: {
      transaction_id: "{{GiveEasy - transaction ID}}",
      value: {{GiveEasy - amount integer}},
      currency: "AUD",
      items: [
       {
        item_name: "{{GiveEasy - item_name}}",
        index: 0,
        item_category: "{{GiveEasy - item_category}}",
        price: {{GiveEasy - amount - integer}},
        quantity: 1
      }]
  }
});
</script>- Under Triggering we need to create a trigger that triggers only on our GiveEasy thank you page(s), so create a new trigger then type as Page View
- We don’t want this to trigger on all pages, so we need to define some triggering rules to ensure we only trigger this tag on the GiveEasy-specific thank you page(s). We find the rule base shown below works well for the GiveEasy pages we’ve seen so far; it looks for pages on the GiveEasy sub-domain and for the word “Thanks” in the URL:

Step 4: Create the Trigger based on the Custom Event
If you’re paying attention, you may have noticed that the custom HTML above triggers an event called “giveEasyPurchase”, we now need to create a trigger in GTM that listens for this event so that we can trigger the GA4 purchase event to such up the dataLayer code and trigger a glorious eCommerce transaction.
To do this we need to:
- Head to the Triggers section in the left nav
- Create a new trigger, select custom event as the trigger type and call it GiveEasy – Purchase
- Enter giveEasyPurchase as the Event name as shown below:

Step 5: Create the GA4 Purchase Tag based on the Custom Event
This final step will suck up the data in the custom HTML dataLayer we produced in step 3 and push it into your GA4 account as an eCommerce purchase.
- Select Tags
- Create new – this time, select Google Analytics: GA4 Event
- Configuration Tag: select your base GA4 tag (if you don’t already have GA4 in place in GTM then now is a good time to get it up and running)
- Event Name: purchase
- More Settings and under Ecommerce select “Send Ecommerce data” and select Data Layer as the source from the drop-down
- Under triggering, select the GiveEasy – Purchase trigger that we created in step 4

We hope you found this guide useful. If you’re still scratching your head trying to get this to work then you can simply download our GTM template here it’s all done for you.